Naxos Music Library allows for the exporting and importing of personal playlists. There are a few reasons why you might wish to take advantage of this feature.
1. Back up your work - Should you accidentally delete a playlist, unfortunately there is no way for us to recover it for you. If you export a playlist once it’s completed and save it to your computer, however, you will then be able to import it later if needed, allowing you to recover the playlist as it was when you exported the file.
2. Move a personal playlist to the Professor account - Professors or individuals authorized to share playlists with the general subscription may wish to transfer playlists made in their Personal Playlist account to the Professor account by exporting them from the former, then importing them into the latter under the “[My Institution] Playlists” tab.
3. Change of institution - If you change institutions and your new institution also subscribes to Naxos Music Library, you can transfer your playlists this way rather than having to recreate them.
4. Share your playlists - If you would like to share a personal playlist with colleagues or friends at any institution with an NML subscription, you can export a playlist and email it to them to import into their Personal Playlist accounts.
Import Playlist
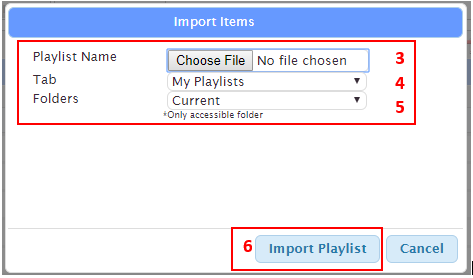
1. Select the Playlist/s you wish to Import.
2. Click Import.
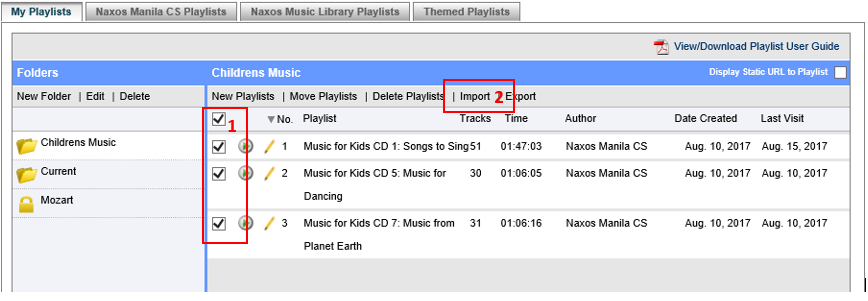
3. On pop-up screen, click Browse to select file to import.
4. Tab will be ‘My Playlist.’
5. Folder. Select the folder group you want to import the playlist to.
6. Click Import Now button.
The imported file will be listed on your screen with name beginning with Imported.
Export Playlist
1. Click checkbox to select specific playlist to export.
2. Click Export button.

3. On pop-up screen, click Export Playlist/s and Save files on your preferred directory.
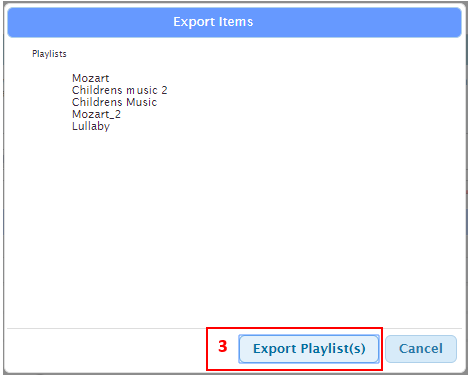
4. Multiple playlists can be exported simultaneously, but they will be combined into one .xml file. If you wish to export multiple playlists that need to be imported separately from each other, you will need to export them individually so that you have separate .xml files for each.
5. The default name for an exported file will be “NMLPlaylist_Export_MonthDayYear.xml” or something similar. If you are exporting multiple .xml files, you may wish to change each file name once exported so as to make it easier to distinguish from the others.
Delete Playlist
1. Click checkbox to select specific playlist to delete.
2. Click on Delete Playlists.
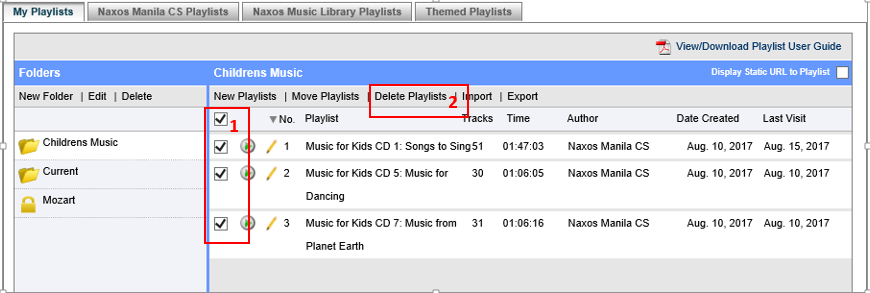
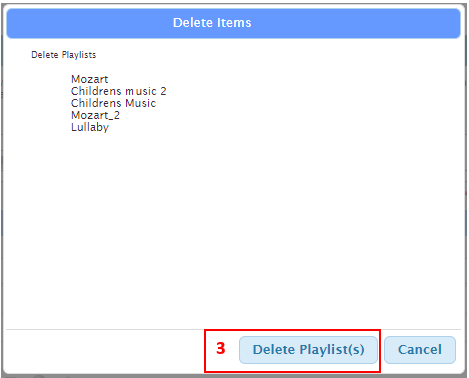
3. On the popup screen, click on Delete Playlist/s button to confirm.
NOTE:
You cannot un-do the deletion process. Please ensure that your selection is correct, otherwise, you have to re-create the playlist.
0 Comments